
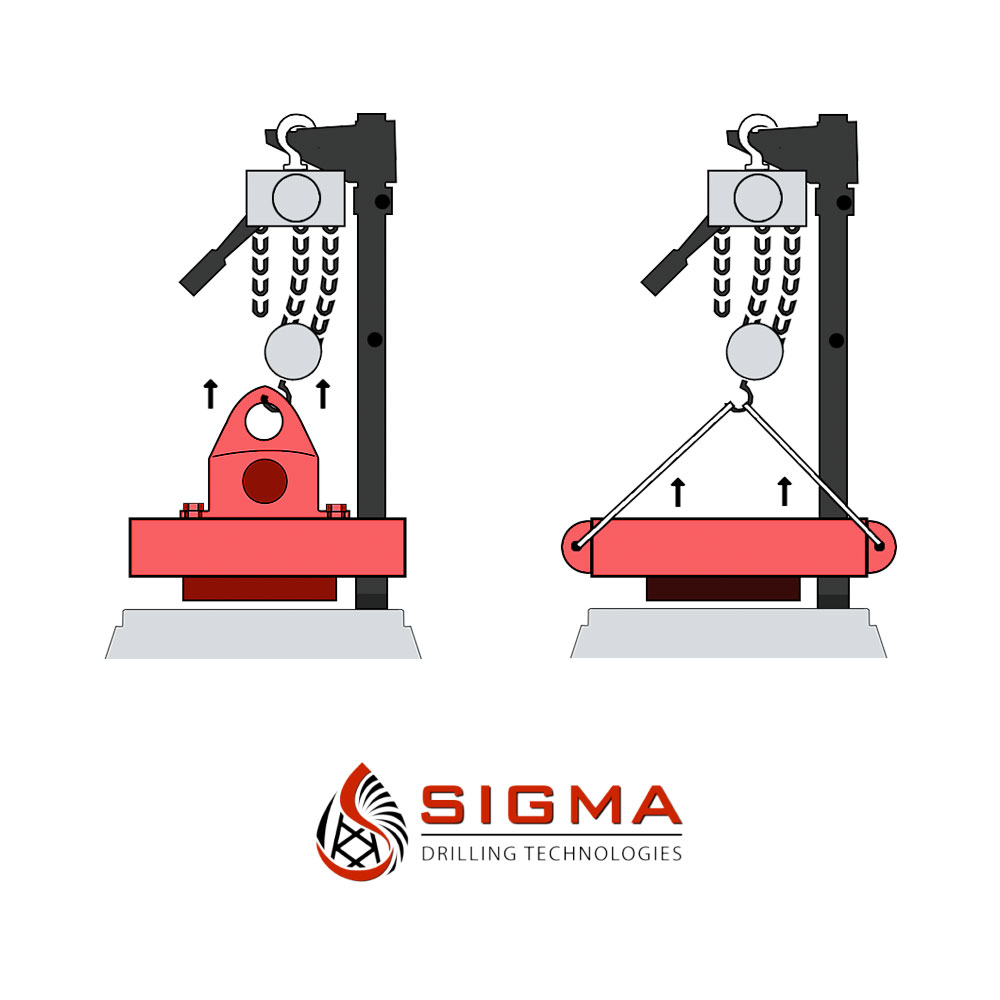
A properly serviced pulsation dampener is critical for your mud pumps’ efficiency, safety, and performance. Unfortunately, there aren’t many resources available to educate personnel on executing safe and effective servicing procedures. Please review the following steps with your personnel for safe pulsation dampener maintenance.

Should you or your personnel have any questions regarding pulsation dampener maintenance, please don’t hesitate to ask. Sigma is more than happy to help you to ensure safe and proper care is being completed on your pulsation dampening equipment.

How To Service Mud Pump Pulsation Dampeners

Download the free white paper now.

Step 1

Make sure operational pressure is at zero PSI.

Step 2

Remove the dust cover from the top of the dampener, if present.

Step 3

Open the charging valve on top of the dampener to remove any existing pre-charge pressure.

Step 4

Once pressure is completely drained, remove charging valve and pressure gauge.

Step 5

Remove nuts securing cover plate.

Step 6

Remove one stud from the body of the dampener.

Step 7

Use a wedge to “free” the cover plate from the body of the dampener.

Step 8

Insert Sigma Service Pole into dampener body through coverplate.

Step 9

Attach lifting arm to Sigma Service Pole.

Step 10

Attach lifting hoist to Sigma Service Pole lifting arm.

Step 11

Reinstall dust cover (If this is your lifting point).

Step 12

Attach lifting straps to lifting points and lift cover plate.

Step 13

Rotate cover plate away from body.

Step 14

Remove old stabilizer plate from inside old bladder.

Step 15

Remove old bladder.

Step 16

Clean the throat of the dampener body and inspect for sharp edges or shards.

Step 17

Visually inspect the interior of the body for sharp burs or missing material.

Step 18

Lightly lubricate the inside throat of the dampener.

Step 19

Insert new bladder or Sigma Suspension Bag.

Step 20

IF BLADDER

Extend bladder to the bottom of dampener. Insert stabilizer plate inside bladder. Take steel stabilizer plate and bolt and fasten the stabilizer plate to the plug in the bottom of the bladder. Secure bladder or suspension bag collar on the indented shelf on the body opening.

IF SIGMA CFC KIT

Insert compression wedges in offsetting pattern. Layer one = offset pattern, layer two = opposite offsetting pattern. Continue through all four layers. Secure bladder or suspension bag collar on the indented shelf on the body opening.

Step 21

Lightly lubricate the ID of the collar. Do not lubricate the top of the collar as this is the sealing surface.

Step 22

Rotate cover plate back over dampener body.

Step 23

Slowly lower the cover plate straight down onto the body of the dampener.

Step 24

As cover plate is being lowered, insure the collar of the bladder or suspension bag stays secure on the shelf on the body opening.

Step 25

Disconnect lifting straps and hoist from Sigma Service Pole arm.

Step 26

Remove Sigma Service Pole.

Step 27

Lubricate stud with copper grease and reinsert stud into dampener body.

Step 28

Lubricate all stud threads & nut threads with copper grease and reinstall nuts.

Step 29

Torque all the nuts to the proper manufacturers’ torque value in cross pattern.

Step 30

Remove dust cover.

Step 31

IF BLADDER

Reattach working pressure gauge. Reattach working charge valve.

IF SIGMA CFC KIT

Replace valve and gauge with plugs. Place CFC Kit Sticker on Dampener. You are ready for operations.

Step 32

Reattach dust cover.

Determine target operational pressure. Get several nitrogen bottles. **Safety Warning** Make sure you are using nitrogen only. Pre-charge bladder to 60% of desired operational pressure. For optimal performance, make sure you adjust pre-charge to match operational pressure conditions.

You are ready for operations.